Create the project directory
- Make sure it's inside your public_html directory
|
|
Create each of the required subdirectories within project:
- Make sure you've cd'ed into the project directory.
|
|
Create empty web pages:
- Go into each subdirectory,
- Use touch to create each page.
You're doing this so that once you create your navigation table, you'll have pages to link to. |
|
Create another subdirectory of project called template. You'll place your navigation template page in this directory;
- This directory needs to be at the same level as each subdirectory so that, when you link to each page, those relative links will remain valid when the navigation table is placed into the page template, which will get placed into each subdirectory.
- cd into the template subdirectory
|
|
| Start Mozilla, and open a composer window |
See the Mozilla Composer job aid to see how to call up Mozilla;
- If Mozilla is already running, perform the next step; otherwise, when you open a composer window, a new composer window appears, and you won't need to click the New button.
|
Create a page that will contain only the navigation system. |
|
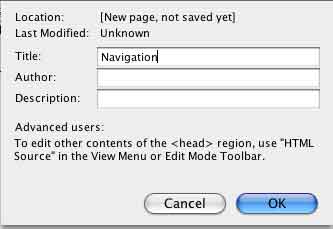
Name and title it navigation.html & navigation table, respectively.
Access this dialog box from the Page Title & Properties... option from the Format menu. |
|
Save this page as navigation.html
- Remember, it has to be saved in the template directory, so that relative links constructed in it's navigation table will remain valid once the table is placed into pages in the other subdirectories.
|
|
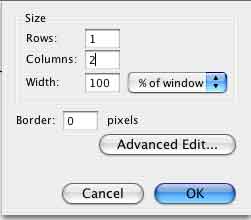
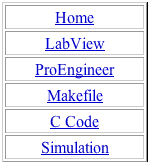
This will either be a table that runs horizontally (1 row, 5 columns) across the top of each page.
If you decide on a vertical navigation table, set the width to be 100% of whatever object it resides inside. |
|
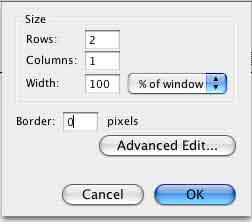
Or create one that runs vertically (5 rows, 1 column) along the left (or right, although that's not advised) side of the page.
If horizontal, make sure that you choose a specific pixel setting for the table width. Don't worry if you don't get it perfect the first time; you can use the table properties dialog box to change it's width if necessary. |
|
| Next, create a template page. This page is only a table that contains a cell for the navigation table and another cell for the content. |
|
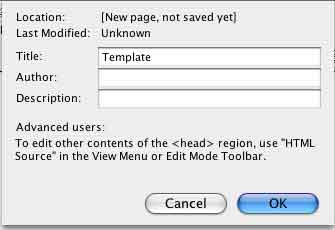
Name it template.html, and give it template as a title.
As above, access this dialog box from the Page Title & Properties... option from the Format menu. |
|
| Since this table will contain all of your content and the navigational table, it can span the entire width of the browser window, or you can try to estimate a reasonable pixel width for the table that will handle most broswers and computers (This used to be 640 pixels, but can likely be closer to 700 or 800 given typical display settings). |
|
If your navigation table is horizontal across the top of the page, then your template table will have 2 rows and 1 column.
The top row contains the horizontal navigation table, and the bottom row contains content. Make the border size 0. |
|
If your navigation table is vertical along the side of the page, then your template table will have 1 row and 2 columns.
The left column contains the vertical navigation table, and the right column contains content. The border should be 0 pixels for this template as well. |
|
Starting with your template page (It is currently a shell of 2 empty rows or 2 empty columns.), use the Save As... option from the File menu to create:
- labview.html
- proengineer.html
- makefile.html
- ccode.html
- simulation.html
All of these pages should be located in the same directory, so that they can be relatively linked via the navigation table.
Also, make sure to change the titles for each of these newly created pages. |
|
Next, place text in each of the cells in your navigation table for each of the above pages, and link each of these text titles to their respective pages.
Look at the linking page for more information on linking text and images. |
|
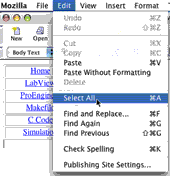
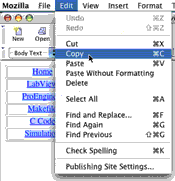
| Select All of the navigation page (Since it is only made up of the navigation table, you'll just be selecting the table) and then Copy it. |
|
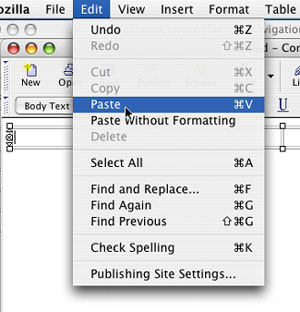
Paste this navigation table into the appropriate cell of each page (This will be the left-most cell for vertical navigation, and the top-most cell for horizontal navigation).
Save each page after the Paste. You now have the foundation installed, and you can add appropriate conten,t for each page. |
|